
A water filter is a simple device that removes bad stuff from the water we drink. Brita water filters are a great, simple way to enjoy better-tasting water right at home. These are very popular filters. They give you a trusty, economical way to make the quality of the water people drink better every day.
People use Brita filters primarily to make their water taste better and smell fresher. The filter catches things like chlorine, which the water company (government or associated agency) puts in to clean the water. When this chlorine is removed, the water tastes much better. Additionally, using a Brita pitcher offers significant convenience; you skip buying and carrying heavy plastic bottles from the store.
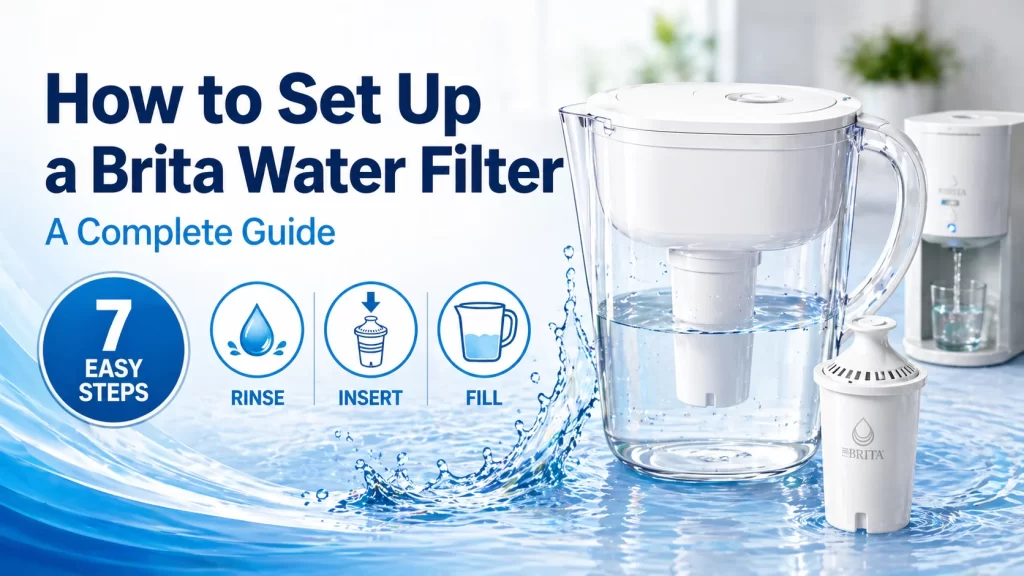
Setting up a new Brita water system is a straightforward process that requires just a few simple steps. This guide clearly walks you through the entire process.
Here are the steps:
- Unpack the Brita Pitcher
- Clean the Pitcher and Components
- Prepare the Brita Filter
- Insert the Filter Into the Reservoir
- Flush the Filter With Cold Water
- Discard the Initial Filtered Water
- Fill the Pitcher for Regular Use
Our comprehensive guide shows you exactly how to set up a Brita water filter, whether you have a new pitcher or a dispenser. Knowing the right way to prepare and install it in the filter ensures this works perfectly right away. You will also learn about the two best Brita water filters (Brita Hub and Brita Elemaris XL).
1. Unpack the Brita Pitcher
You simply open the Brita box first. Remove all the major components, including the pitcher itself, the lid, the reservoir that holds the tap water, and the new filter.
Check the inside of the box for small instruction papers or clear plastic seals wrapped around the parts. Remove any plastic wraps protecting the components. Make sure every piece you took out of the box matches the picture of your model.
Look closely at all the parts to make sure nothing is broken. Everything looks good, and then you move on to the next step.
2. Clean the Pitcher and Components
Wash the big parts now. Wash the main pitcher, lid, and reservoir with warm water and a small amount of mild dish soap. This step removes any dust or factory smell from the new plastics. Rinse each piece thoroughly with clean water.
Soap residue tastes bad and also messes up the filter, so rinse until the water runs completely clear. You dry the components with a clean towel. It also air-dries quickly if you put the pieces on a dish rack. Make sure all the parts are totally dry before you start placing the filter in.
3. Prepare the Brita Filter
You prepare the filter according to its type. Standard Brita filters, which are the white ones, need soaking. Put one of those in a cup of cold water for about fifteen minutes. This helps water flow smoothly later.
The newer Elite or Stream filters do not need soaking. You simply hold one under cold running water for a fast rinse instead. This rinse removes loose dust from the carbon inside.
Make sure the whole filter gets fully wet. A completely damp filter allows water to flow through without any bubbling or stopping when placed in the pitcher.
4. Insert the Filter Into the Reservoir
Take the filter and line it up with the hole inside the reservoir. The filter has a small notch or groove, so you match that up.
Push down hard, or sometimes you twist the filter to lock it into place. This depends on the type of Brita you purchased. You listen for a slight click, which indicates that the filter is seated correctly.
Check that the filter sits very firmly inside the reservoir opening. It cannot move around or wiggle loosely. A secure filter guarantees that all the water gets cleaned when you pour it.
5. Flush the Filter With Cold Water
Now that the filter is in, run cold tap water through it right away. Fill the top reservoir with cold water.
The water starts dripping through the filter and into the main pitcher. This first pour helps wash away tiny, harmless bits of carbon dust from the new filter.
This first full fill-up totally activates the filter material inside, which prepares it to clean water well for the next few months.
6. Discard the Initial Filtered Water
You get a full pitcher of filtered water from the first pour. You throw away this first batch. You also throw away the second batch, making it 1–2 times more wasteful to pour the water down the sink.
This water sometimes has tiny gray or black specks, which are just bits of carbon dust. They do not harm you, but the water tastes better if you discard them.
After you throw away the first couple of fills, the filter is fully cleaned out. The filtered water is now ready to drink and use every day.
7. Fill the Pitcher for Regular Use
You fill the reservoir again with cold tap water. The water begins to purify itself as it flows through the filter at its regular rate. Wait a minute until the lower pitcher fills up. Put the lid on tight once the cleaning is finished. Now you store the pitcher where you like it.
You maintain a high water level by refilling the reservoir immediately after pouring a glass. This makes sure you always have clean, cold water ready to drink.
What Are The Common Mistakes to Avoid When Setting Up a Brita Filter?
The common mistakes to avoid when setting up a Brita filter are usually simple errors that make the water flow slowly or stop the filter from cleaning the water well. That happens when people skip important steps, such as priming the filter or ensuring it sits correctly. Avoiding these small missteps makes sure you get clean, great-tasting water right away, and that saves time.
The following are the common mistakes to avoid:
- Air bubbles
Air gets trapped inside the filter if you skip the soaking or rinsing step for a new cartridge. Air pockets block the water, slowing down the flow of the drip. You always prepare the filter by soaking or rinsing it first; this removes all the air.
- Misalignment
The filter must sit tightly and straight inside the reservoir hole. If you push the filter in crooked, unfiltered water sneaks past the sides into your pitcher. Push down firmly and listen for the click or feel the locking mechanism secure it.
- Using hot water
You must only use cold tap water with your Brita filter. Hot water damages the filter media inside, making the carbon less effective at cleaning the water. Only fill the reservoir with water directly from the cold faucet.
- Forgetting to discard the first batch
The first two batches of filtered water contain harmless carbon dust. If you drink the water right away, you ingest those black specks. Always discard the first two full pitchers to thoroughly flush out the dust.
We tested two great Brita models, examining how quickly they filter and how well the water tastes afterward. You will get authentic information about their performance and efficiency.
What Are The Top Brita Water Filters?
The top Brita water filters are reviewed by us in detail, giving you all the facts you need to choose the best one for your home. We tested these two great models, examining how quickly they filter and how well the water tastes afterward.
1. Brita Hub Instant Powerful 12-cups Countertop Water Filter
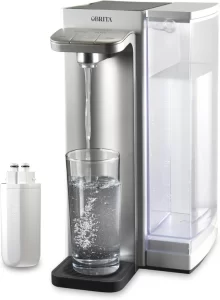
The Brita Hub Instant Countertop Water Filter is an electric device that brings speed and superior performance to your kitchen bench.
| Feature | Detail |
| Brand | Brita |
| Model | Hub (87340) |
| Price | $194.95 |
| Dimensions | 11.5″ W x 9.06″ D x 16.69″ H |
| Rated Flow Rate | Instant (Push-Button Dispense) |
| Maximum Capacity | 12-Cup Reservoir (96 oz) |
| Purification Mechanism | Pressurized Filtration (Hub Filter) |
Filtration Technology and Performance
The Hub uses a powerful, single-stage Hub filter cartridge. This filter contains activated carbon and ion exchange material, using an electric pump to push the water through the media quickly. This design, which relies on pressure, lets the filter pack the material tightly, giving it better contact time with contaminants. The system reduces over 75 contaminants, making the water much cleaner than a regular Brita pitcher. The filter lasts for 120 gallons, which equals about six months of average use.
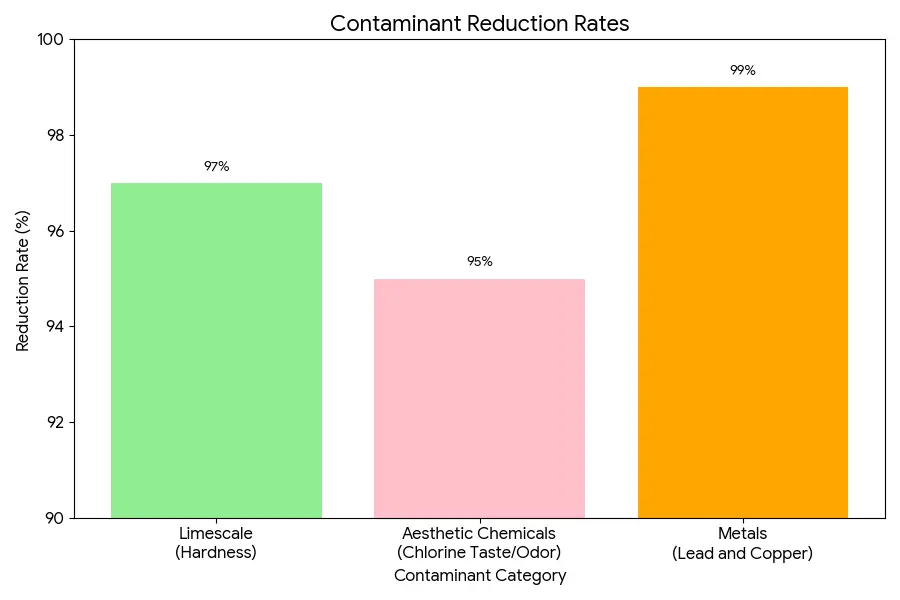
Contaminants and Reduction Rate
The Hub filter gives high contaminant reduction, targeting serious pollutants beyond taste and odor. The graph below shows the contents and their respective removal rates with respect to the Brita Hub water filter:

Certification and Trust
The Brita Hub earns strong trust because its filter gets certified by top independent groups. The Brita Hub filter receives certification from two major testing bodies:
- WQA
- IAPMO R&T
The WQA (Water Quality Association) tests this system and certifies it against three major standards: NSF/ANSI Standards 42, 53, and 401. These standards demonstrate that the filter effectively reduces substances that alter the water’s taste, such as chlorine; substances that pose health risks, like lead and mercury and emerging contaminants, including certain drugs and pesticides.
Cost of Ownership and Maintenance
The initial cost for the hub stands around $194.95. Maintenance involves replacing the Hub filter every 120 gallons or six months. The replacement filter costs approximately $29.99.
Summary
| What We Like | What We Don’t Like |
| Instant filtration (zero wait time). | Requires counter space (bigger than a pitcher). |
| Reduces 99% of lead (high purity). | Needs to be plugged into an outlet. |
| 6-month filter life (easy maintenance). | Higher initial price than non-electric filters. |
Our Final Verdict: Who Is This Filter Best For?
The Brita Hub best suits the convenience seeker or the health-focused apartment. The convenience seeker appreciates the instant dispense feature, which eliminates the need to wait for water to drip through a pitcher, making quick bottle filling very easy. The health-focused choose this system because it delivers a confirmed reduction of serious pollutants like lead and PFOA/PFOS, eliminating those contaminants, which provides great peace of mind. That makes the Hub a powerful home upgrade.
2. Brita Elemaris XL Water Filter Jug
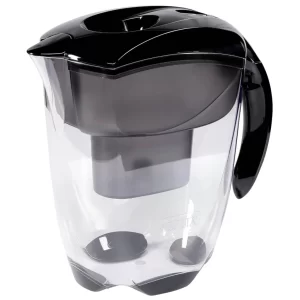
The Brita Elemaris XL Water Filter Jug is a high-capacity, premium pitcher that combines quality German engineering with simple use. This jug delivers great-tasting, softer water, a perfect choice for those who drink a lot of water or make many hot drinks.
| Feature | Detail |
| Brand | BRITA |
| Model | Elemaris XL |
| Price (Approx.) | $81.81 |
| Dimensions | Standard Jug Size |
| Rated Flow Rate | Gravity Filtration (Slow Drip) |
| Maximum Capacity | 3.5 L Total / 2.2 L Filtered |
| Purification Mechanism | Gravity Filtration (MAXTRA+ or MAXTRA PRO) |
Filtration Technology and Performance
The Elemaris XL uses the popular MAXTRA+ (or newer PRO) filter cartridge. This filter uses a mix of carbon and ion exchange beads. The carbon cleans the water by reducing things that cause bad smells and tastes, like chlorine. The ion exchange beads perform the second key job. They actively remove metals and reduce limescale (hardness) from the water.
This softening process makes the water taste much better and helps keep appliances like kettles and coffee makers working longer. The full capacity of 2.2 liters of filtered water makes this jug bigger than standard pitchers, so you fill it less often.
Contaminants and Reduction Rate
The graph below shows you the contaminants and their respective removal rates with Brita Elemaris XL:
Certification and Trust
The Brita Elemaris XL uses the MAXTRA PRO filter, which holds a strong trust guarantee from third-party testing. Brita clearly states the MAXTRA PRO filter gets tested for PFAS and other serious chemicals.
Brita’s testing shows that the MAXTRA PRO filter meets the requirements of a key US health standard: NSF/ANSI Standard 53. Furthermore, the filter meets requirements for JWPAS B.210, which is a high-level Japanese filtration standard.
Cost of Ownership and Maintenance
The initial price of the Elemaris XL jug is low, often around $81.81. Maintenance involves replacing the MAXTRA filter every four weeks, which is a shorter life compared to newer US-based Brita filters.
Summary
| What We Like | What We Don’t Like |
| Excellent limescale reduction (protects appliances). | The filter only lasts four weeks (frequent buying). |
| BRITA Meter indicator (accurate timing for changes). | Does not reduce complex contaminants like PFOA/PFOS. |
| Large 2.2 L filtered capacity. | Gravity filtering means you wait for the water to drip. |
Our Final Verdict: Who Is This Filter Best For?
The Brita Elemaris XL best suits the hot drink lover or the limescale fighter. The hot drink lover chooses this jug because the high limescale reduction makes tea and coffee taste much better, preventing a filmy surface. The limescale fighter appreciates that it actively protects expensive kitchen items like kettles and espresso makers from mineral buildup.
How to Maintain and Clean Your Brita Water Filter Pitcher?
Maintain and clean your Brita water filter pitcher with regular, simple steps that keep the water tasting fresh and prevent bad things from growing inside. Keeping your pitcher clean makes the filter work better and last longer.
The following are the simple steps for maintaining your pitcher:
- Weekly cleaning
You clean the parts of the pitcher that come into contact with the water every week. Remove the filter and wash the reservoir and pitcher with warm, soapy water. This removes any slime or mineral buildup that happens over time. Rinse everything very well to remove all soap.
- Avoiding dishwasher damage
Most Brita pitchers are dishwasher-safe, but please use the top rack only. The high heat from the bottom rack damages the plastic over time. You must never put the lid or the electronic filter change indicator in the dishwasher because the electronics break easily. Handwashing the lid is best.
- Proper storage
You store the pitcher in the refrigerator once you fill it with water. Storing it in the fridge keeps the water cold and slows down any growth of mold or algae inside the plastic. If you stop using the pitcher for a while, dry all the parts completely before storing it away in a cabinet.
- Replacing the filter on time
You change the filter when the indicator light or meter tells you to, or every two to six months, depending on the filter type. An old filter does not clean the water well, and sometimes it releases the bad stuff it trapped back into your water. Write the date on the new filter cartridge so you remember when to change it.
Water Filter Way provides the most authentic reviews and details on water filters like the Brita, which encourages honest buying decisions. We thoroughly test these systems, providing you with accurate information that helps you understand how to use and care for your filter for optimal results every day.
How long should I soak a Brita Standard filter before using it?
You soak a Brita Standard filter before using it for about 15 minutes in cold water. Soaking the filter removes air bubbles from the carbon inside. This action is called priming. Priming prevents the filter from dripping slowly when you first start using it, which is important for smooth water purification. You simply fill a cup and let the filter rest there completely submerged for that time.
Do Brita Elite and Stream filters need soaking before setup?
No, Brita Elite and Stream filters do not need soaking before setup. You only need to hold those filters under cold running tap water for about 15 seconds instead. The newer design of these filters allows you to skip the long soak time, saving you a few minutes during setup. This quick rinse removes any loose carbon dust before you put the filter into the reservoir.
Why do I need to wash my Brita pitcher before the first use?
You need to wash your Brita pitcher before its first use because washing removes any dust or small particles left from the factory and packaging. This action makes sure the first water you drink tastes clean. Washing the reservoir and the pitcher prevents dust from mixing with your clean water, making sure that it is as pure as possible.
How do I know if my Brita filter is inserted correctly?
You know your Brita filter is inserted correctly when the filter sits firmly and straight inside the reservoir opening. Many models require a firm push or a slight twist until you hear a slight “click.” The seal at the top must look fixed against the plastic; otherwise, unfiltered water slips past the seal and mixes with your cleaned water.
Is it normal to see black particles during the first filtration?
Yes, it is normal to see black particles during the first filtration. These specks are harmless bits of activated carbon dust from the filter itself. The dust rinses out completely after the first one or two batches of water. You discard these first batches of water to remove the carbon dust, so you do not drink it.
Why do I have to discard the first few batches of filtered water?
You have to discard the first few batches of filtered water because the filter releases loose carbon dust during initial activation. This step flushes out all the fine particles and fully prepares the filter to trap contaminants in water. Throwing away the first two reservoir-full amounts makes sure the filter works perfectly for the rest of its life.
How long does the first filtration take after setup?
The first filtration after setup takes about 10 to 20 minutes for a full pitcher using a gravity filter, like the Standard or MAXTRA+. The exact time depends on your water pressure and the specific filter you have. The filter cleans the water while it slowly drips through the media. The electric Hub filter dispenses the first water instantly.
Can I use hot water in a Brita filter after installing it?
No, you cannot use hot water in a Brita filter after installing it. Only fill your Brita pitcher with cold tap water. Hot water damages the filter’s structure and the carbon material, reducing its power to clean the water. Damaging the filter means it cannot properly reduce heavy metals in drinking water or chlorine; therefore, always use cold water.
How often should I replace my Brita filter once it’s set up?
You replace your Brita filter once it’s set up, depending on the filter type you use. The Standard filter lasts about two months. The newer Elite and Hub filters last for about six months or 120 gallons. Always follow the manufacturer’s directions or watch the electronic indicator light on your pitcher to determine the exact time for a change.
What should I do if my Brita filter is filtering too slowly after installation?
You check the filter alignment and re-prime if your Brita filter is filtering too slowly after installation. The problem usually happens when air gets trapped inside the filter or if it is not seated firmly in the hole. Remove the filter, soak or rinse it again, then push it back in tightly. Try pouring the water again to resolve the slow drip.

