How to Install a Well Water Filter Cartridge
To install a well water filter cartridge, shut off the water, release trapped pressure, open the housing, remove the old cartridge, clean and inspect the seal, seat the new cartridge correctly, close the housing, then restart and flush the system before use. This guide covers replacing a cartridge inside an existing well water filter housing, not the plumbing of a complete filtration system. It walks through cartridge compatibility, pressure isolation, housing preparation, cartridge seating, O-ring sealing, restart, flushing, and how to confirm the installation is leak free and working correctly.
What Should You Verify Before Installing a Well Water Filter Cartridge?
Check cartridge compatibility before you buy or install a new one, since cartridges are not universally interchangeable between housings. A cartridge that looks similar to your old one may still be the wrong size, media type, or micron rating for your specific system.
Compatibility attributes to check against the manufacturer's specification:
Attribute | Why it matters |
Housing model | Confirms the cartridge is rated for your specific housing |
Cartridge dimensions | Wrong length or diameter can leave gaps or prevent the housing from closing |
Media or type | Sediment, carbon, or specialty media serve different purposes |
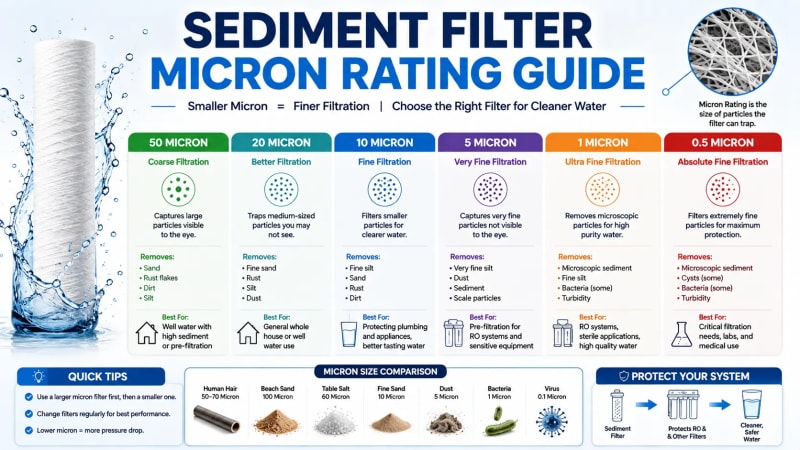
Micron rating | Determines what size particles the cartridge can capture |
Seal configuration | Some cartridges use an end cap gasket, others rely on the housing O-ring |
Flow requirements | The cartridge must support the flow rate your household needs |
Always confirm these details against the manufacturer's cartridge specification sheet rather than assuming a visually similar cartridge will fit correctly.
Which Tools and Replacement Parts Are Needed for the Cartridge Installation?
Gather everything you need before you shut off the water, so the housing is not left open longer than necessary.
Tools and parts checklist:
Correct replacement cartridge: Matched to your housing model and water treatment needs.
Housing wrench: Required for housings that need extra leverage to open or close, if applicable to your model.
Bucket or container: Catches water that drains from the housing during removal.
Clean towels: Useful for spills and for drying the housing before reassembly.
Replacement O-ring: Needed if the existing one shows cracks, stretching, or damage.
Manufacturer-approved silicone lubricant: Used to lubricate the O-ring for a proper seal.
Mild, non-abrasive cleaning cloth or sponge: For cleaning the inside of the housing.
Avoid substituting petroleum-based lubricants for the O-ring, since these can damage certain seal materials. Use only what the manufacturer recommends.
Where Should a Well Water Filter Housing Sit in the Water Line?
A whole house cartridge filter for well water is typically installed after the pressure tank. Pentair specifies this placement for its heavy duty filtration systems, positioning the filter downstream of the pressure tank and ahead of the household plumbing it protects. Exact system layouts vary between homes and manufacturers, so always follow the installation diagram provided with your specific system rather than assuming every setup is identical.
How Should You Shut Off Water and Release Pressure Before Opening the Housing?
Isolating the system and releasing pressure protects both you and the housing from a sudden release of water when you open it. Skipping this step is one of the most common causes of a messy or unsafe cartridge change.
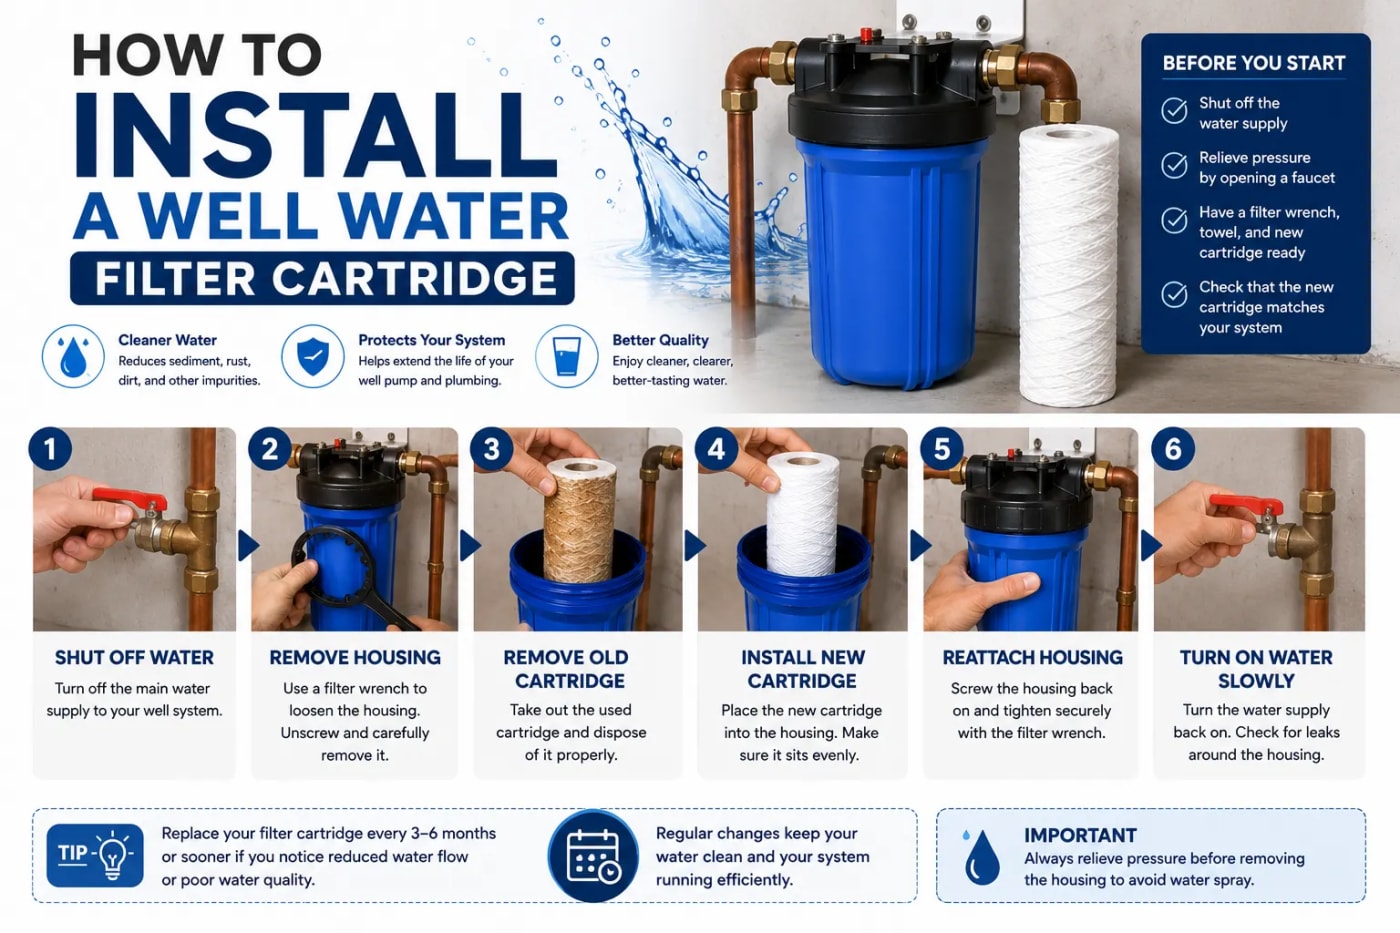
Steps to shut off water and release pressure safely:
Turn off the main water supply, or close the shutoff or bypass valve for the filter system.
Open the nearest faucet downstream of the filter to release pressure in the pipes.
Press the pressure relief button on the housing, if your system has one, to release any remaining trapped air and pressure.
Place a bucket or container under the housing to catch water that drains out.
Confirm no water is spraying or dripping under pressure before you attempt to open the housing.
Manufacturer instructions from Pentair, Culligan, and Aquasana all require this pressure relief step before opening the housing, regardless of the specific system design. The exact valve arrangement depends on your setup, so identify your shutoff and bypass valves ahead of time if you are not already familiar with them.
How Do You Remove the Old Filter Cartridge From the Housing?
Open the housing using the correct method for your model, then remove the old cartridge from inside. Housing rotation direction varies by manufacturer, so check your manual before applying force in either direction.
Steps to remove the old cartridge:
Use a spanner or housing wrench if your model requires one to loosen the housing.
Turn the housing sump in the direction specified by the manufacturer to open it.
Lift the sump away from the cap, keeping it level to avoid spilling residual water.
Remove the old cartridge from the standpipe inside the housing.
Empty any remaining water from the sump into your bucket.
Do not force the housing open if it feels stuck. Some models are simply hand-tight and open with steady, even pressure, while others genuinely need a wrench. Applying excessive force in the wrong direction can damage the housing threads.
How Should You Clean the Filter Housing and Inspect Its Seal?
Clean the empty housing and check the O-ring or gasket before installing the new cartridge, since a damaged or dirty seal is one of the most common causes of leaks after a filter change.
Housing cleaning and seal inspection checklist:
Rinse the sump: Clean out any sediment, debris, or residue left behind by the old cartridge.
Wipe the O-ring groove: Remove dirt or grit from the groove where the O-ring sits.
Inspect the O-ring or gasket: Look for cracks, flattening, stretching, or other visible damage.
Replace a damaged seal: Swap in a new O-ring if the old one shows any signs of wear.
Check the cap threads: Confirm the threads on the cap and sump are clean and free of debris.
The seal is what prevents leakage between the housing components once it is closed. Culligan and Pentair both specify inspecting and cleaning the O-ring as a required step before reassembly, and both recommend replacing it if there is any visible damage rather than reusing a questionable seal.
How Do You Position the New Cartridge Inside the Filter Housing?
Set the new cartridge onto the standpipe inside the bottom of the housing, making sure it sits centered and fully seated. This step determines whether water flows correctly through the cartridge instead of bypassing it.
Steps to position the new cartridge:
Remove the new cartridge from its packaging and check it against your compatibility notes.
Center the cartridge over the standpipe in the bottom of the housing.
Lower the cartridge straight down so the standpipe enters the cartridge opening evenly.
Confirm the cartridge sits flush and does not tilt to one side.
Pentair's installation instructions specifically state that the cap standpipe must slip into the cartridge when the housing is reassembled. Cartridge construction differs between manufacturers, including gasketed-end designs, so always follow the orientation shown in your system's diagram rather than assuming every cartridge seats the same way.
How Should You Lubricate and Seat the O-Ring Before Closing the Housing?
Lubricate the O-ring with a manufacturer-approved silicone grease before you close the housing, since a dry or poorly seated O-ring is a common cause of leaks.
Steps to lubricate and seat the O-ring:
Apply a thin, even coating of silicone grease around the O-ring.
Place the O-ring back into its groove on the housing cap.
Smooth the O-ring into place with your finger, pressing it down evenly into the groove.
Confirm the O-ring sits flat and level, with no twists or gaps.
Pentair and other manufacturers specifically call for silicone grease rather than petroleum-based lubricants, since some seal materials react poorly to the wrong type of grease. Do not use thread tape as a substitute for a proper housing seal. If the O-ring shows any damage at this stage, replace it before closing the housing rather than reusing it.
How Do You Close the Filter Housing Without Damaging the Seal?
Align the housing carefully before threading it back onto the cap, and tighten it by hand rather than forcing it with a wrench.
Steps to close the housing correctly:
Align the sump with the cap so the threads engage evenly.
Thread the housing onto the cap, turning it in the direction specified by the manufacturer.
Hand-tighten the housing until it feels snug.
Use a spanner wrench only if your manufacturer's instructions call for a light additional turn, and avoid overtightening.
Overtightening can crack the housing or damage the O-ring seal, while undertightening can leave the housing loose enough to leak. Manufacturer instructions typically warn against using excessive force, so hand-tight plus a light wrench snug is usually sufficient.
How Should You Restart and Flush the Well Water Filter Cartridge?
Restore water to the system slowly, release any trapped air, then flush the new cartridge before using the water. Rushing this step can push air into your household plumbing or leave residual carbon fines in the water.
Steps to restart and flush the system:
Slowly open the main water supply or shutoff valve to allow the housing to fill with water.
Press the pressure relief button, if present, to release trapped air from the housing.
Open a nearby faucet and let water run to flush the new cartridge.
Flush for the length of time specified by your cartridge or system manufacturer.
Flush duration is not universal across all systems. Pentair specifies a five-minute flush for some of its referenced systems, while other manufacturers, including some Culligan models, specify different periods. Always follow the exact instructions included with your cartridge, since flush time can depend on the type of media inside it.
How Can You Verify That the New Cartridge Is Installed Correctly?
Check the housing and water flow carefully once the system is back online, before considering the installation finished.
Verification checklist:
Inspect housing seams: Look closely for any dripping or seepage around the cap and sump.
Confirm normal water flow: Check that pressure and flow at household faucets have returned to normal.
Check cartridge seating: Confirm the cartridge has not shifted or become dislodged during filling.
Observe initial flush water: Watch for any unusual color, particles, or cloudiness as the system flushes.
If everything checks out, the installation is complete. If anything looks off, address it immediately rather than leaving a housing that may be leaking or improperly sealed.
What Should You Check if the Filter Housing Leaks or Water Flow Drops?
Leaks and reduced flow after a cartridge change usually trace back to a small number of common causes. Separate leak problems from flow problems, since they typically have different causes.
The table below shows common problems, their likely causes, and the corrective action:
Problem | Likely cause | Corrective action |
Water leaking from the housing seam | O-ring not seated correctly, damaged, or dry | Reopen the housing, clean and relubricate the O-ring, and reseat it evenly |
Persistent leak after reseating the O-ring | Damaged or worn O-ring | Replace the O-ring with a new one |
Leak despite a good O-ring | Housing overtightened or misaligned | Reopen, realign the threads, and hand-tighten without forcing it |
Reduced water flow after installation | Incorrect cartridge fit or micron rating too fine for the application | Confirm the cartridge matches the housing and application specification |
Sudden pressure drop right after installation | Trapped air in the system | Open a faucet and allow air to bleed out, or use the pressure relief button |
Low flow that develops over time | Cartridge becoming clogged with sediment | Follow the manufacturer's replacement schedule for that cartridge type |
No water flow after restart | Bypass or shutoff valve not fully reopened | Check that all valves are returned to their normal open position |
If a leak or flow problem continues after checking these causes, do not continue troubleshooting the entire plumbing system on your own. Contact the manufacturer or a water treatment professional for further diagnosis.
How Does Well Water Quality Affect the Cartridge You Install?
The right cartridge for your well depends on the actual problems in your water, not a generic assumption that every well needs the same filtration. Sediment, iron, hardness, and bacteria are common well water concerns, but each one calls for a different type of cartridge or treatment approach. A sediment cartridge captures particles, while contaminants like iron, hardness minerals, or bacteria often need a different filtration or treatment method entirely. The EPA recommends testing private well water and selecting treatment based on the specific contaminants detected, rather than installing a cartridge without knowing what your water actually contains.
How Often Should You Replace a Well Water Filter Cartridge?
Replacement intervals vary depending on the cartridge, the manufacturer, your water quality, and how much the flow rate has dropped. Aquasana, for example, specifies different replacement intervals for its different pre-filter and post-filter cartridges, since each one is designed for a different stage of filtration. There is no single interval that applies to every cartridge or every well. For a full breakdown of replacement timing by cartridge type, see our guide on how often to change a well water filter cartridge.
Which Filter Cartridge Is Best for Well Water?
The best cartridge for your well depends on your tested water conditions and the specific contaminant you need to address. A sediment problem calls for a different cartridge than an odor, taste, or iron problem, and no single cartridge covers every situation. For a full comparison of sediment, carbon, and specialty filtration cartridges, see our guide on the best filter cartridges for well water.
How Do You Test Well Water Before Choosing a Filter?
Testing your well water tells you which contaminants you are actually dealing with, so you can choose a cartridge that addresses your real water quality issues instead of guessing. The EPA recommends testing private wells annually for total coliform bacteria, nitrates, total dissolved solids, and pH. For the complete testing process, see our guide on how to test well water.
How Do You Remove Sediment From Well Water?
Removing sediment from well water is a specific filtration task, separate from the general cartridge installation process covered in this guide. It typically involves matching cartridge type and micron rating to your sediment load. For a complete sediment-specific treatment guide, see our page on how to remove sediment from well water.
How Do You Choose the Right Water Filter Micron Rating?
Micron rating is one of the compatibility attributes you check before buying a cartridge, and it should be matched to the specific filtration requirement and system specifications for your well. Choosing correctly depends on your particle size and sediment load. For a full explanation of how to choose the right micron rating, see our guide on how to choose a water filter micron rating.
Conclusion
Installing a well water filter cartridge comes down to careful preparation and following the correct order of steps. Confirm cartridge compatibility, shut off water and release pressure safely, clean the housing and inspect the seal, seat the new cartridge correctly, lubricate and reseat the O-ring, then restart and flush the system before use. Check for leaks and confirm normal flow once everything is back online. With the right cartridge matched to your actual well water conditions, this routine maintenance step keeps your household water clean and your plumbing protected.