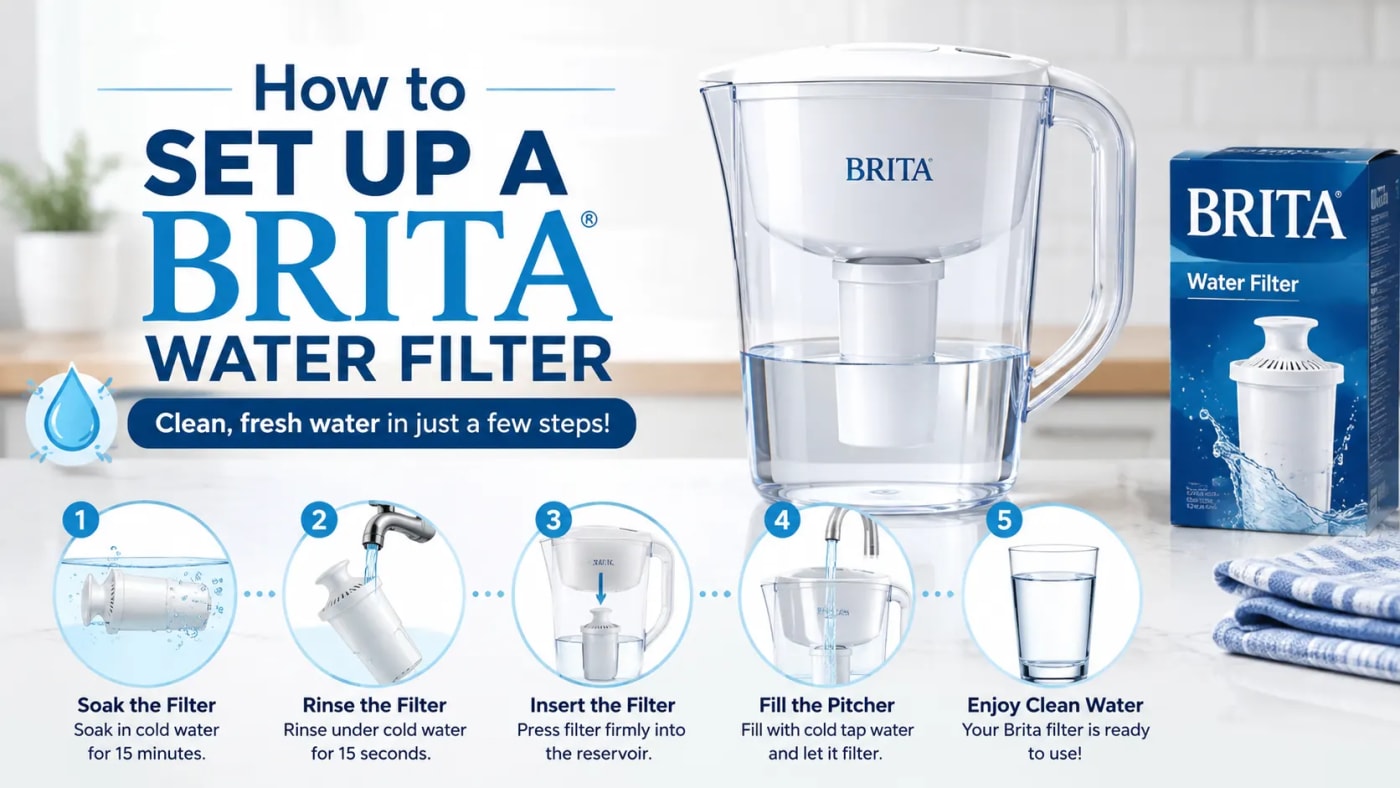
To set up a Brita water filter, wash the pitcher parts, rinse or flush the filter, insert it into the reservoir, fill it with cold tap water, and discard the first few pitchers before drinking. The exact steps change a little depending on the type of filter you own. Brita makes several systems, including the Original (Standard), Elite, Stream, and Refillable filters, and each one has its own setup method. This guide walks through preparation, installation for every filter type, first-use flushing, indicator activation, and how to check if the filter does not seem to fit right.
What Should You Prepare Before Setting Up a Brita Filter?
Before you install a new filter, gather everything you need and get the pitcher ready. This short setup stage prevents leaks, bad taste, and installation mistakes later.
What you need before setup:
Pitcher or dispenser: The main body that holds the water.
Lid: Covers the reservoir and often holds the filter indicator.
Reservoir: The top chamber where the filter sits and unfiltered water is poured.
New filter: Matched to your exact pitcher or dispenser model.
Clean hands: Wash your hands before touching the filter or reservoir.
Mild dish soap: Used to clean the pitcher parts, never an abrasive cleaner.
Cold tap water: Brita systems are designed for cold water, not hot water.
Only use potable drinking water in a Brita filter. The filter is built to improve taste and reduce certain substances in water that is already safe to drink. It is not designed to treat unsafe or non-drinking water.
How Should You Clean the Brita Pitcher Before Installation?
Wash the pitcher, lid, and reservoir by hand with mild dish soap before you insert the filter for the first time. Rinse every part well so no soap residue remains, since soap can affect the taste of your water.
Pre-setup cleaning checklist:
Remove packaging: Take off any plastic wrap or stickers on the parts.
Hand wash: Clean the pitcher, lid, and reservoir with mild dish soap.
Avoid abrasive cleaners: Do not use scouring pads or harsh chemical cleaners.
Skip the dishwasher: Brita states that pitcher and dispenser parts should not go in a dishwasher.
Rinse well: Rinse each part until the water runs clear.
How Can You Identify the Brita Filter Type Before Installing It?
Check the filter type before you begin, because the Original (Standard), Elite, Stream, and Refillable filters each need a slightly different setup process.
The table below shows how to identify each Brita filter type by its appearance:
Filter type | Color or design | Best known for |
Original (Standard) | White | Everyday use, shortest lifespan |
Elite | Blue | Longer lifespan, more reduction |
Stream | Gray, fits a filter cage | Filters water as you pour |
Refillable | Reusable shell with loose filter media | Lower waste, manual refill |
Match the filter in your hand to the pitcher or dispenser you own before you start installing it, since filters are not interchangeable across all models.
How Do You Install a Brita Original or Standard Filter?
To install a Brita Original or Standard filter, rinse it, align it with the reservoir, press it into place, then add water.
Steps to install an Original or Standard filter:
Rinse the filter under cold running water for 15 seconds.
Line up the groove on the filter with the ridge or notch inside the reservoir.
Press the filter down firmly until it forms a tight seal.
Fill the reservoir with cold tap water.
Do this with clean hands, and check that the filter sits flat and does not wobble before you fill the reservoir.
How Do You Install a Brita Elite Filter?
To install a Brita Elite filter, skip the pre-rinse step and go straight to inserting and sealing the filter.
Steps to install an Elite filter:
Line up the groove on the filter with the ridge or notch in the reservoir.
Press the filter firmly into place until it seals tightly.
Fill the reservoir with cold tap water.
The main difference from the Original filter is that Brita does not require a 15-second pre-rinse for the Elite filter. This filter is built to last longer than the Original filter, so treat the extra durability as a feature, not a reason to skip proper seating.
How Do You Install a Brita Stream Filter?
To install a Brita Stream filter, flush it, orient it correctly, click it into the cage, then attach the cage to the lid.
Steps to install a Stream filter:
Flush the filter under cold running water for 15 seconds.
Hold the filter with the blue ring facing up.
Press the filter into the filter cage until it clicks into place.
Attach the cage to the lid with a firm twist.
Activate the filter indicator on the lid.
A Stream filter works only with a Stream system. It filters water as it pours instead of while it sits in the reservoir, so the cage and lid attachment matter more than they do with a standard pitcher filter.
How Should You Flush a Brita Filter Before Drinking the Water?
Flush a new Brita filter based on its type, since the pre-rinse and discard steps are not the same for every model.
The table below shows the flushing requirement for each filter type:
Filter type | Pre-rinse needed | Water to discard first |
Original (Standard) | Yes, 15 seconds under cold water | First three pitchers |
Elite | No pre-rinse required | First three pitchers |
Stream | Yes, 15 seconds under cold water | Follow the model instructions |
It is normal to see small black flecks, known as carbon dust, in the first few fillings. This comes from the activated carbon inside the filter and is not a sign of a faulty product. Discarding the first few pitchers, or using that water for plants, clears out this dust before you drink from the pitcher.
How Do You Activate the Brita Filter Life Indicator After Setup?
Activate the filter life indicator right after you install a new filter, so it can track how much water has passed through it.
Steps to activate a filter indicator:
Check whether your pitcher has an electronic indicator or a sticker indicator.
For an electronic indicator, press and hold the RESET button, usually for a few seconds, until it resets.
For a sticker indicator, set the dial or sticker to the current month.
Confirm the indicator shows an active or full status after reset.
Indicator instructions differ between models, and some newer pitchers ask for different hold times depending on the filter mode you select. Check the user guide that came with your exact pitcher or dispenser before you rely on the number of seconds you hold the button.
How Can You Tell Whether a Brita Filter Is Installed Correctly?
A Brita filter is installed correctly when it sits flush in the reservoir, does not leak or wobble, and the indicator responds normally.
Signs of a correct installation:
Firm seating: The filter does not move when you touch the reservoir.
Groove alignment: The groove on the filter matches the ridge or notch in the reservoir.
No bypass water: Water passes through the filter instead of leaking around its edges.
Correct fill level: The reservoir is not filled above the MAX FILL line.
Working indicator: The indicator responds when reset and tracks use afterward.
Brita warns that filling the reservoir above the MAX FILL line can cause water to spill into the handle of the pitcher. Press the filter firmly into place, since a loosely seated filter can pop out when the reservoir is filled.
What Should You Do if a Brita Filter Does Not Fit or Filter Correctly?
If a Brita filter does not fit or filter correctly, recheck the alignment and seating first, then look at the specific symptom.
The table below lists common setup problems and what to do about them:
Symptom | Likely cause | What to do |
Filter feels loose | Groove not aligned with ridge or notch | Remove the filter, realign it, and press firmly again |
Water leaks around the filter | Filter not seated properly | Reseat the filter and press down until it seals |
Filter pops out | Not pressed in firmly, or reservoir overfilled | Reinstall the filter and keep water below MAX FILL |
Filtration seems very slow | Normal for a brand new filter, or air trapped in the filter | Allow the water to filter fully before judging speed |
Indicator will not reset | Wrong hold time or wrong indicator type for the filter | Check the model-specific reset instructions |
If a problem continues after you recheck the setup, it likely relates to water quality or sediment rather than installation. Brita's own support guidance is the most reliable source for troubleshooting steps that go beyond basic setup.
What Should You Do After Your Brita Filter Is Ready to Use?
Once you install the filter, confirm it is seated correctly, and discard the recommended first pitchers of water, the pitcher is ready for daily use with cold tap water. From here, your main tasks shift from setup to ongoing care, such as knowing when to replace the filter and how to keep the pitcher clean.
How Often Should You Change a Brita Filter?
Replacement timing depends on the filter type and how much water your household uses. Brita currently lists the Original (Standard) filter at about 40 gallons or two months, the Elite filter at about 120 gallons or six months, and the Stream filter at about 40 gallons or two months. For the full replacement schedule and signs that a filter needs changing, see our guide on how often to change a Brita filter by type.
How Should You Clean a Brita Pitcher?
Remove the filter before washing, then hand-wash the pitcher, lid, and reservoir with a mild detergent and rinse well. Avoid abrasive cleaners, and check your specific model before placing any part in a dishwasher. For a complete cleaning routine, see our guide on how to clean a Brita water filter pitcher.
What Does a Brita Filter Remove From Tap Water?
All Brita filters are certified to reduce chlorine taste and odor, and some models also reduce contaminants such as lead, copper, cadmium, and mercury. The exact reduction claims depend on the specific filter and its certification. For the full breakdown by filter type, see our guide on what a Brita filter removes.
How Does a Brita Water Filter Work?
A Brita filter uses activated carbon and other filter media to reduce certain substances and improve taste as water passes through it. For a closer look at how this process works, see our guide on how Brita water filters work.
Can You Use Hot Water in a Brita Pitcher?
No, Brita pitchers are designed for cold tap water only. Hot water can damage the filter and the pitcher. For more detail on temperature limits, see our guide on whether you can put hot water in a Brita filter.
Conclusion
Setting up a Brita filter is simple once you know which type you own. Clean the pitcher parts, prepare the filter the right way for your model, seal it firmly into the reservoir, and discard the first few pitchers of water before you drink from it. After that, activate the indicator so it can track filter life, and check the setup signs above if anything feels loose or slow. With the filter installed correctly, your pitcher is ready to give you fresh, filtered water every day.